Some time a month or two ago, I looked at the calendar and realised that hot weather would be here soon. So I needed to do something about getting some shade on the chicken coop as soon as possible. It was then that I dreamed up the design for a hanging garden, built on the shady side of the coop above beak level. Ideally, plants would both grow up and over the roof to help cool it in summer, as well as down towards the ground providing some greens for the chickens to peck without destroying them.
Thus, the PVC hanging garden was born!

So, of course, I did a little diy tutorial as we were going – my DS1 was my partner in crime. He’s the brawn and I’m the mad scientist designer!
 Start with a trip to the hardware store to buy some t-pieces and end caps for your selected size of pipe. We used 90mm pipe because we still had 3m left from our last project. 2 end caps and 3 t-pieces means 3 planting holes in the garden.

Measure the width of your garden and make some wild calculations regarding the 4 pieces of pipe you will need. My planner, DS1, decided to make the end holes close to the ends, with the other one exactly in the middle. Make sure you allow for the 1 1/2 to 2cm which will be tucked inside the t-pieces when you do your calculations.
 Test fit it all together and against your hanging space, just to make sure that you got it right. We used up all kinds of odd scraps of pipe we had from the builders, we have enough left to make a couple more!
 Make sure that you get quality inspection from the site supervisor, aka the family dog. Bonus points on your inspection if she has a bow on her collar – that makes it more official!
 After gluing it all together with pipe glue – the non-pressure variety is just fine, drill a couple of rows of fine holes along the bottom for drainage. Boys love this stage where they get to use power tools!
 So how high do you want this thing mum? Bit higher I think.
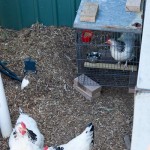
This part is tricky and could use a third pair of hands. While trying to keep it level, we screwed brackets over the pipe (4 in total). Because the tin of the coop is rather flimsy, someone had to support some battens inside the coop to help grab the screws and distribute the weight on the side of the coop.
 Ok, so it doesn’t look too flash in here, but the chickens won’t care, and we were using up pieces of scrap wood so we didn’t have to buy any more!
 Yes, it looks a little bent here, but I reglued a joint the next day and it’s now much straighter. You can see our four brackets to support the weight as well.
I filled it up with potting mix, mixed about 2 to 1 with the decaying straw from the ground around the coop. Pre-fertilized, and it added bulk whilst keeping the weight down.
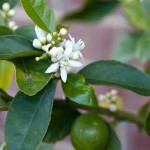
We have planted 5 nasturtium seeds into each hole, so hopefully after they germinate we will get a couple to go up and a couple to hang down from each one. They may require a little assistance in the growing up part, perhaps with trellis or wire, but we will see how they go before adding it.
Nasturtium is an excellent plant tonic for chickens. According to Green Harvest (excellent source of seeds and information) nasturtium is a laying stimulant, antiseptic, antibiotic, insecticide, and wormer. But please, if you are planning anything in your coop do some research to make sure it’s ok for your chickens to eat.
So, now all we need is the seeds to grow, and our hanging garden will be complete! Now I come to think of it, I think there’s room for one more on the fence…… now where did I put my hacksaw?
Total cost, including seeds? $44.87, including seeds, potting mix, brackets and screws. Obviously if you have these around already, the cost will reduce dramatically!
I would love to see it if you make something like this – link us up!
I’d love to see it if you make one, or something like this.
Please be aware that there may be affiliate links in this content. Your support allows me to keep creating for you!

df
What a great little project! We’re big re-users of what ever we have on hand – it feels good and keeps you on your toes with making things work. I love this idea and adding nasturtiums to our coop sounds wonderful.