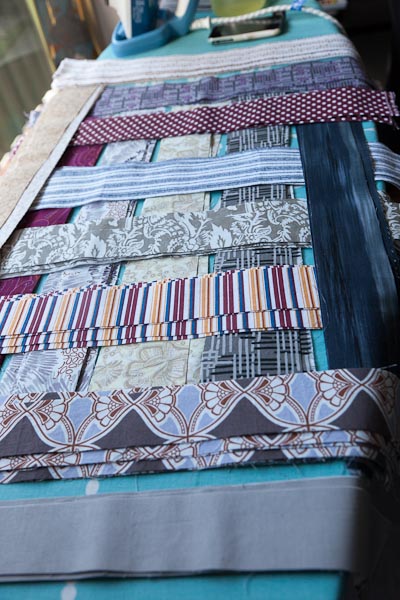
So, while I’ve been busy doing other things away from the computer, I have been steadily adding to my Wonky Log Cabin blocks. The whole patchwork top is coming together nicely, however, I have had to source some alternate sashing for the final light toned logs on each block, as I have already been through one and a half metres of fabric. Unfortunately, as if often the case when you buy something so long ago, there is no more to be had, so I have kept the same light value and just mixed it up a little. Overall, viewing from a distance, you’d never notice that they are different.
I originally cut strips, measuring from 3″ to 2 1/2″, 2 1/2″ to 2″ and 2″ to 1 1/2″ inches wide across all my fat quarters. Each block has only needed each fabric once, except for the 4 faux “sashing” strips, at 2″ across the width of fabric. To make the most of my sashing fabric, I have occasionally joined the trimmed ends together to make longer logs, which is hardly visible on the finished trimmed block.
I thought I’d put together a little step by step as to how I’ve made these blocks, and what I’ve found works and doesn’t work for me.

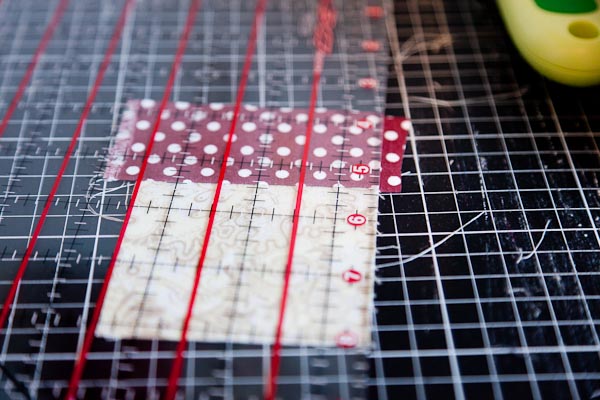
Firstly – pin, pin, pin!! I pin every log – starting with my first “square” which is around 2 1/2″ to 3″. At least one edge of this square is cut on an angle.
It’s so easy to trim as you go with a smaller board and ruler right beside the sewing machine.

I keep all the scraps from each strip, so I chose from among those pieces to get each block started.

Pressing all the seams to the newly added log, and always remembering to proceed clockwise.

Here you can see I have pinned into the three sections of the block, however, I have learned to stitch with the new log on top – this reduced a lot of stretching at the seams for me.

I trim the log shorter before pressing, but AFTER sewing it on. The scrap goes back on the pile to find a new home in the next block.

Keep in mind, that all these strips have already been cut on an angle – so check as you are placing each strip if you want the width to go on the left or right end – in the example above, the width needs to go to the left, otherwise the block will develop a very large angle which will not work as well. However, if an angle still isn’t looking right to you, you can always trim the logs down before proceeding with the next row.
Keep adding logs until the entire block measures approximately 10″ square, remembering that when you add your final light value sashing of 2″ wide, you will lose 1″ per width and length in seams. You want to have more to play with for the final trimming than less, so you can really accentuate the angle of the finished block.

Here is the current number of blocks – since laying this out I have completed 2 more, so there are 4 left. This will give me a finished quilt of 5×5 blocks, or 60″. Using this method, I have been crunching out the blocks in about 40 minutes, which seems fast to me.

As you can see, the difference between the original “sashing” of brown vine on white has been met by the muted little floral of grey on white. Both tone very well with all the different fabrics making up each block, and really form a nice background against which the stronger fabrics can pop.

So, I’d better get to work to finish those last 4 blocks, so I can get this beauty finished and on the bed. Autumn is definitely coming – the nights are chillier, although we are still enjoying daily sunshine.
Related articles
- Grey and purple quilt started (cassandramadge.wordpress.com)

Please be aware that there may be affiliate links in this content. Your support allows me to keep creating for you!

March in review | Hands, Heart, Passion
[…] over the long weekend, I finished piecing together my wonky log cabin quilt…. today while everyone is back at work and school and the house is beautiful and quiet, […]
hexagon quilt – the end of one, and the beginning of the next …
[…] I’m off and running with the second quilt … it’s great ‘quiet time’ therapy for me after a busy day. You can see what Cassie has been up to, in the quilting world, right here! […]
Wonky Log Cabin Quilt Completed!! | Hands, Heart, Passion
[…] See the progress of it here and here…. […]