So, the first week back from daylight saving is seriously kicking my rear end. I may have mentioned that before. I really can’t remember. I’ve already been sleep deprived for weeks, and now my body clock has reset itself and wakes me up every morning at 5.30am, regardless of how much sleep I’ve actually had the night before, so it’s been an interesting week. However, despite this, I have managed to be surprisingly productive with my early starts, as I’ve been slowly chugging through my to-do list earlier every morning!
I picked up this Burda 7798 pattern when Spotlight were having one of their buy one get one free pattern sales. I know I pretty well swore off the big pattern companies, but I’m still in search of the perfect little cotton tunic top. Something a bit hippy, that’s easy to sew, easy to wear, and looks cute to boot. I had a couple of previous attempts that I haven’t yet shared with you – they were mostly successful, however because they were straight grain tunics with no zips or other fastenings, they were pretty shapeless. Even with some fairly extreme seam shaping after the fact.

I’m afraid my first hint of trouble should have been the little cute girl on the front cover. I deliberately chose a Burda pattern because I am pretty consistently spot on size wise with them. The T-shirts I made with them (blogged previously here and here) were spot on the money. I am a classic Burda size and shape. I thought. Burda rather irritatingly do not put measurements on the outside of their patterns, but that’s ok, because I know what size I am, right? Apparently not. According to this pattern I was out by 2 sizes and I went from a 40 to a 44. Which I only worked out after I’d traced out the first 2 pieces of the pattern.
So I proceeded to retrace the entire pattern as a 44, which is as big as this particular pattern went. Great for the ego I know. The tracing was murder on the eyes and back so it took me a couple of days work on the kitchen table, so it’s a good thing I have a patient family!
One thing that I have learned to do though, is to trace out every single piece, so if you want to change which view you are making, you have the pieces all ready to go instead of having to unfold your pattern sheet again! I also photocopied the pattern piece layout which was printed on the pattern sheet instead of on the instructions, so I had that for future reference as well.
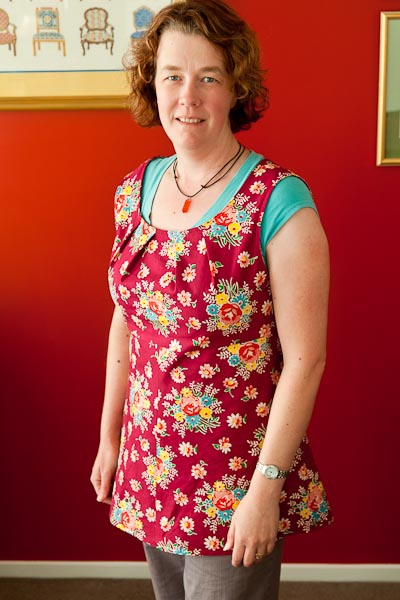
I picked up some gorgeous Denyse Schmidt quilting cotton from 2011 on clearance at Spotlight, 2 metres for less than $10. I was going to use it for some practice squares for free motion quilting but decided it was just too pretty, so it became my trial top. A couple of hours pinning, cutting, overlocking and pressing, and things were looking very good. It took another day in the end, but the finished product is fantastic!

So, as you can probably tell from here, I definitely didn’t need to go up 2 whole sizes. I’m still not confident enough in the measurements vs ease vs pattern thing to make that call, I trusted them when they said that a 40″ bust needed a size 44. Live and learn. However, I’m not at all upset, because what I really wanted was a cute tunic type top I could wear over t-shirts for winter, to brighten up all my plain t-shirts into something a little bit more fun. This definitely fits the bill.
 The neckline sits fabulously thanks to the beautiful bias facing, however if I wasn’t wearing a shirt underneath there would be side boobage, bra and back showing, so definitely too much room here.
So, how did I know I definitely made it too big? When I tried it on without the zip and realised that there was absolutely no need to put one in! In fact, I even ran a couple of lengths of elastic along the seam allowance at the waistline in the back to draw the back in a little. DH was really complimentary about this, his observation was that it looked like it was always meant to be there! Alternatively, if I hadn’t already sewn and overlocked this seam, I could definitely have looked at reshaping the back dart to take in some more of the bulk back there. So, fitted top + no zip = size too big!
The only other adjustment I made was to lengthen the upper bust line an inch. This meant the empire waistline actually fell under my bust instead of across it, which is much more to my liking. Looking at these photos, maybe I could have gotten away without doing this, but I am really happy with the fit in person, so I’ll keep the change for future use. I can’t stand empire tops that creep up over my bust line, you feel like you are constantly pulling them down and rearranging all the time!
I also mitre joined my bias facing ends for the armholes before I attached them, which made for a much easier and neater finish. I totally regret not having done that for the neckline as well, as it was easy to do and looked so much more professional.
Overall, I’m really happy with how this turned out. Was it exactly as the pattern promised? No, not really. If I want to try that style, I will go down a size and see how that goes. However, for a nice fun tunic to brighten up my cooler weather wardrobe, it’s a definite winner and I’m looking forward to making a couple more. I will also drop the size down and try for a light summer dress in 6 months when summer returns to this side of the planet!
Please be aware that there may be affiliate links in this content. Your support allows me to keep creating for you!


Summer Tunics | Fat Chic
[…] Burda 7798 Tunic conversion […]
Burda 7798 Take Two » Cassandra Madge
[…] very careful measuring, remembering my last effort with this pattern, I decided to be brave and go down 2 sizes to a 14. I knew there should be plenty […]