No, I haven’t been hibernating all winter – I’ve been busy quilting and sewing up a storm! I have so much to share with you, and I’m starting here, with my first ever attempt at the Maker’s Tote. I was gifted a beautiful version of this bag a couple of years ago, however I wanted a larger size for taking supplies to classes, including the recently finished Australian Machine Quilting Festival, where I had to carry quilt sandwiches, rulers, marking tools, sketchbook and notebook, as well as pens/pencils, snacks, water bottle, lollies and all sorts of goodies that a girl might need for a full day of class!
If it’s a new design to you (the pattern was released back in 2015, so it’s been around a while) the Maker’s Tote was created by Anna Graham of the site, Noodlehead. Coming in two sizes, it is classed as an Intermediate/Advanced level bag. I wouldn’t make this as your first foray into bag making, however the most challenging items are sewing the gusset (because of the tight curve and fit under a machine), attaching the binding and inserting the side pocket zipper.

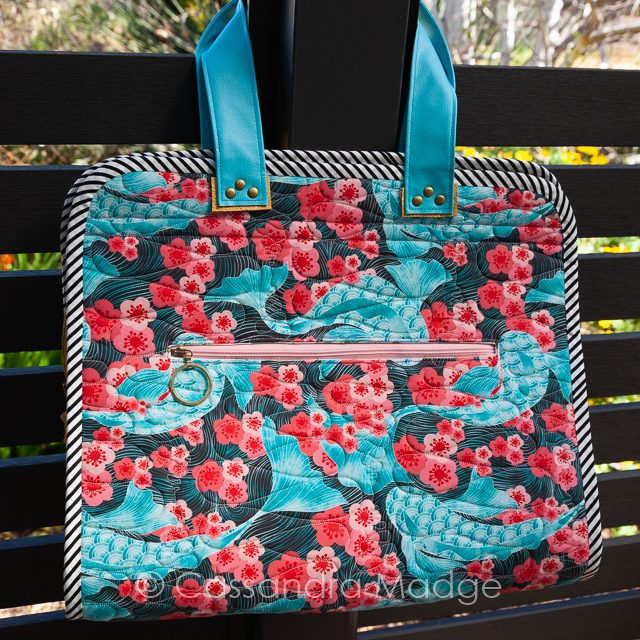
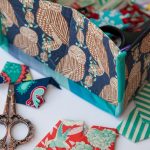
For my outer two fabrics, I picked designs from Spoonflower, where you can shop for fabrics and much more, all custom printed on demand to your size and fabric substrate needs. These were printed onto the Kona Cotton, simply a fat quarter of each. It’s a good idea to check out the scale of each print when you choose them, as you can see, the cranes on the front are a siginificant size and would have been cut off on a smaller project. You can find the links to each of these prints, as well as others I like HERE.
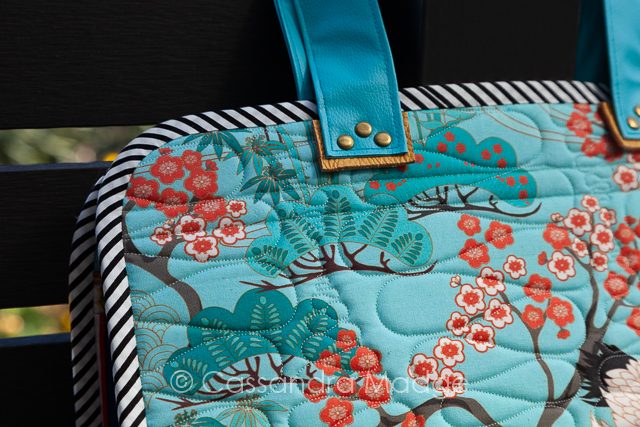
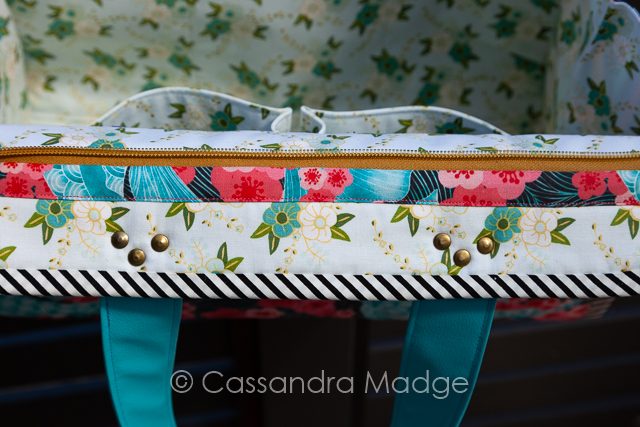
I opted to omit the front patch pocket as I didn’t have enough fabric to pattern match it and was unwilling to cover up any of that glorious fabric. The designs all sing to me on a deep level – cherry blossoms, irises (my favourite flower), curving branches and clamshell printing. Rather than attaching the handles by sewing over them, I added a piece of mustard yellow leather as a frame, and attached them with 3 brass rivets. After carrying this bag, fully loaded, over my shoulder for 4 days, only 1 rivet of the 12 came adrift, so I assume I hadn’t hammered it quite hard enough. Otherwise, they show no sign of wear or strain.
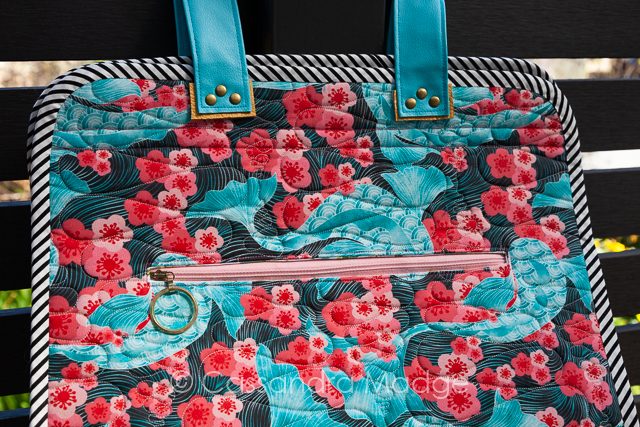
My very first attempt at an inset zipper… it was challenging stitching through all the layers of fabric and foam interfacing, and the edges did NOT want to fold down neatly. The zipper, with it’s funky gold ring pull is from my vintage stash, collected from Op-shops over the years. Always look at the habadashery and zippers when you are in one of those stores. I got the mustard opening zipper at one, a week before I started to make this bag. It was the perfect colour and length!
As I was short of outer fabric, I raided my stash and found this dramatic stripe for the end gussets. A perfect match to so many of the colours in both prints, and a pop of fun when you catch sight of the end of the bag. The black and white bias binding is pre-made, purchased off the roll by the meter at my local spotlight. To manage these tight curves, you really have to have true BIAS binding, not straight grain strips.
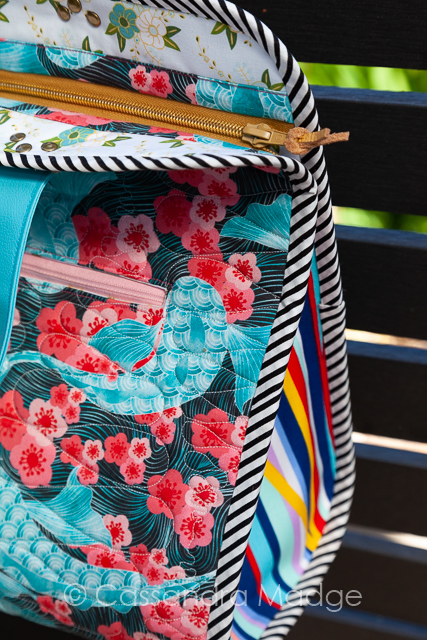
You can see the top zipper here, with a little scrap of leather tied through the zipper pull. Serendipity at it’s finest with all these diverse pieces I pulled together.
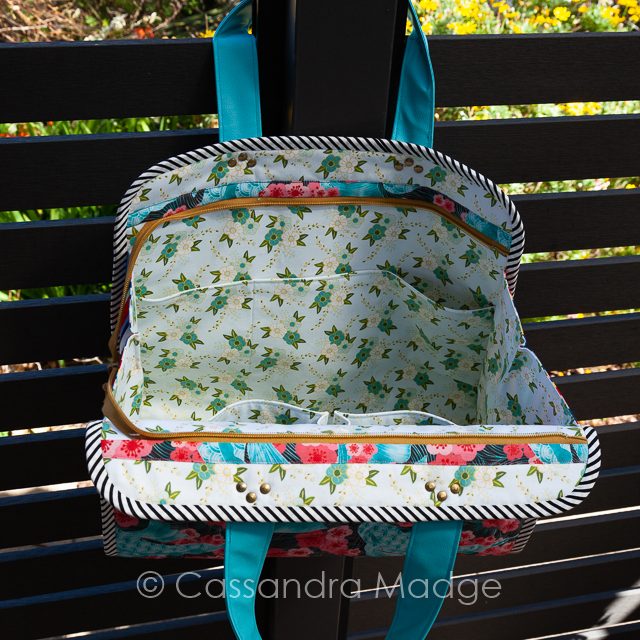
You need a significant amount of fabric for the lining and the two sets of interior pockets, one side of 3 slip pockets, the other side with 2 generous gussets. They are so handy for sliding in pens, rulers, bottles etc. You can see above I used a strip of the Koi print from the back to cover the raw edge of the zipper on both sides. It’s really ingenious how she has you attach it, and is probably the easiest part of the process! You can see here the insides of the handle rivets. Before attaching, I used fray-stop on both sides of the hole. Note the aqua cherry blossom print, with gold accents, that I found at my local quilt shop for the interior. Serendipity I tell you!!
The vinyl handles were easy to make up to a point. They are supposed to be folded in half again for the centre third of the length, making something more comfortable to hold on to. My sewing machine objected quite violently to the suggestion. I will most likely try another way to make it happen, either with rivets again, another machine or at worst, hand stitching! This is my fault for choosing vinyl over the fabric recommended by the pattern, however, so it’s not the fault of the designer.
Anna doesn’t give instructions on quilting the exterior of the bag, but I much prefer my fabric and interfacing to be quilted in some way, if only to help hold all the layers together. Because of the design of the bag and prints I chose, it was quite easy to load the outer, in one long panel with the bottom seam already joined, onto my longarm frame. I quilted it with an all-over f-curve, in interlocking diamonds. I used a very fine off-white thread and tiny stitches, so that it would be smooth and relatively imperceptible over the fabric. I wanted the effect of the quilting texture and shadows, more than the actual stitches to show up.
The verdict? A great bag, easy to make with some previous bag-making experience, particularly with wrestling and inserting zips. I will definitely be making this bag again, as I can see so many uses for it. Perfect for carrying around hand-stitching projects, EPP, embroidery or knitting, or even for class supplies. There’s plenty of help available online if you get stuck, and I strongly recommend giving it a go!
Want something quick and simple to make for the weekend? Hop over to Cosy Project, where their blog features my rope coasters. They were originally published in Homespun Magazine, but they have been shared here for everyone to have a go! Quick Stitch – Rope Tricks.

Please be aware that there may be affiliate links in this content. Your support allows me to keep creating for you!
Leave a Reply