After looking through my T-shirt drawer, I discovered that many of my shirts were a little worse for wear, and I was avoiding wearing a few of them because they were just that little bit too short. Don’t you just hate that length – one that you’re always pulling down because it has a tendency to creep up and freeze your bellybutton!
So the great t-shirt pattern hunt was on. I had 3 metres of fairly ordinary single knit interlock fabric in my stash, courtesy of the local thrift shop.
Contender 1 – Blank Canvas T-shirt from 3hourspast.com. Cost – Free!
Time taken – 1 day from pattern pinning out to finished.
Pattern size used – 40″ bust, however I used the length of the larger size.
I found this pattern through Craftsy, and also spent a while looking through her blog. She is an Australian, which is a bonus, and appears to be a pattern designer that believes in writing patterns to fit as sized, instead of this crazy sizing that the big 4 pattern makers use.
The pattern was easy to put together, and straightforward to lay out on the fabric. The steps were clever and logical, and I had no problems following along. I chose not to make a sleeve band, and instead just used a simple Chain stitch on my Babylock Evolve to finish the sleeve hems. My first attempt at Cover stitch was the bottom hem, but it is something I’m going to need to practice!

For a little touch of fun, I used a 3-step zigzag to catch a short piece of elastic for a few inches at the bottom of each side hem. I like the subtle hip shaping it gave, without compromising on the length that I wanted.
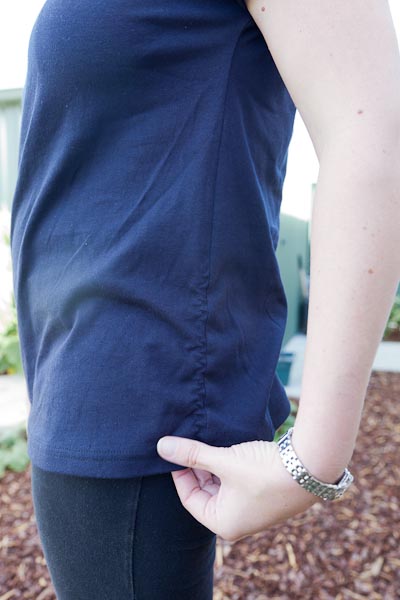
The bust fit was good. They fabric has very little stretch, so I chose not to force myself into the next size down as I was much closer to the 40″.
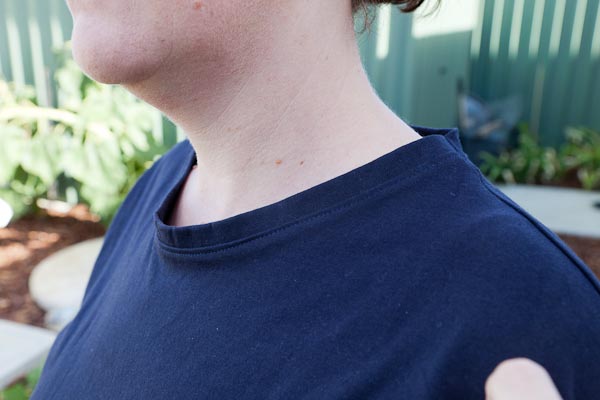
I was very disappointed with the fit of the neckline. Although I was extremely cautious not to stretch as I was going, and it doesn’t appear stretched, the neckline sits up and away from my body, more like a baby boat neck. I wonder if that is also because of the kimono sleeves and the lack of armhole shaping, as it’s not a problem I’ve encountered on previous ready to wear t-shirts.
Verdict:
Although it’s not a disaster, I’m not sure the style would work on me without major alteration. However for someone possibly with a bit more bulk along the shoulder/neck line it might fit a bit better.
Stay tuned for Contender 2!
Please be aware that there may be affiliate links in this content. Your support allows me to keep creating for you!
df
there is nothing worse than a cold middle!! the neckline does look good on you, by the way.
Cassandra
Happy to have found a fellow “cold middle” hater in this world obsessed with showing off their midriffs! Frankly, I’d rather keep mine covered 🙂
grannysmiff
I like the ruching along the side seams.
Cassandra
Ahhh ruching!! That’s the word I was looking for 🙂 So glad you like it!
More Burda sewing | Hands, Heart, Passion
[…] decided to give a self band neckline one more shot, however, I obviously didn’t stretch it hard enough as it’s still not […]